Clipping and Other Visual Effects
The Clip tool allows you to interactively clip volumetric image data, regions of interest, multi-ROIs, and meshes along orthogonal planes in 3D views. You can also apply other visual effects to a Clip box, such as look-up table functions, edge contrast, and window leveling, to further adjust 3D visualizations. You should note that clipping effects can included in animated sequences and in screen captures (see Working with the Movie Maker and Exporting Screenshots).
Clip boxes in 3D view

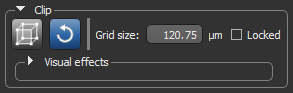
The Clip panel, shown below, is available on the Data Properties and Settings panel.
Clip panel
|
|
Icon |
Description |
|---|---|---|
|
Show/Hide the Clip box |
|
Shows or hides the Clip box of the selected object. |
|
Reset |
|
Resets the Clip box of the selected object. NOTE Multiple Clip boxes are be reset together by selecting multiple objects in the Data Properties and Settings panel and then pressing the configured action for resetting the Clip box (see Configured Actions for the Clip Tool). |
|
Grid size |
|
Indicates the grid size of the Clip box. You can change the default size, if required. NOTE The current grid size is also indicated by the scale, circled below, in the 3D view.
|
|
Locked |
|
If checked, the Clip box of the selected object will be locked. |
|
Visual effects |
|
Lets you apply additional visual effects to a Clip box and to other objects visible in the current 3D view (see Applying Other Visual Effects). |

You can use the configured actions to quickly show or hide the Clip box, reset the box, or lock it (see Configured Actions for the Clip Tool).
Clipping and other visual effects can also be applied with other geometrical forms such as capsules, cylinders, and spheres (see Working with Shapes).
By default, the Clip setting is applied in the Clip panel (see Applying Other Visual Effects for information about applying other visual effects to a Clip box).
Visual effects such as clipping can be applied either to the inside or outside of a Clip box. Check the Outside option to apply the effect to the data of selected visuals that is exterior to the Clip box. Leave the Outside option unchecked to apply the effect to the data of selected visuals inside the Clip box.
- Rotate and position the 3D view so that the plane or planes along the object which you plan to clip are visible and easily accessed (see Using the Manipulate Tools).
- Select the object you plan to clip in the Data Properties and Settings panel.
- Click the Clip
 tool on the Clip panel.
A Clip box appears in the 3D view around the selected object and in the MPR viewer segments of the dataset.
- Do any of the following:
- Click and drag on a face of the Clip box to move a plane up and down or in and out. Each plane of the 6 sides of the parallelogram can be moved independently.

- Adjust the position of the clip planes in the MPR views of the dataset, as shown below.

- If required, you can translate the Clip box by dragging the central control point.
NOTE An object will remain clipped until it is reset. Click the Reset
 button to restore the Clip box to its initial state.
 - Click and drag on a face of the Clip box to move a plane up and down or in and out. Each plane of the 6 sides of the parallelogram can be moved independently.
- Check Locked to lock the Clip box, optional.
Locking a Clip box is usually done when you work with multiple objects.
- Apply the clip other objects that are visible in the 3D view, optional.
Do the following to apply the current clip to another object:
- Expand the Visual effects box to view the available visuals.

- Check the required object(s) in the Visual list.

The clip is applied to the selected visual(s), as shown below.

See Applying Other Visual Effects for information about applying other effects to selected visuals.
- Expand the Visual effects box to view the available visuals.


In addition to letting you interactively clip image data, regions of interest, multi-ROIs, and meshes, additional visual effects, such as look-up table functions, edge contrast, and window leveling, can also be applied to the clipped region of selected objects. Visual effects for clipped regions are available on the Clip panel, as shown below.
Visual effects for clip boxes
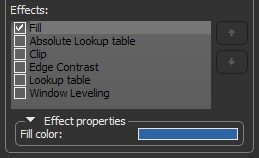
For a selected effect, the Effects box displays the properties based on the nature of the effect and includes controls, such as sliders, menus, and color swatches, that you can use to change its properties. You should note that multiple effects can be applied simultaneously (see Working with Multiple Effects).
Visual effects can be applied either to the inside or outside of the clipped region. Check the Outside option to apply the effect to the data of selected visuals that is exterior to the region. Leave the Outside option unchecked to apply the effect to the data of selected visuals inside the clipped region.
The following effects can be applied to the currently checked object or objects.
| Example | Description | |
|---|---|---|
|
Clip |
|
If selected, the data of selected visual(s) that corresponds to the inside or outside of the Clip box will be clipped. |
| Edge Contrast* |
|
If selected, the intensity values of selected image data that corresponds to the inside or outside of the clipped region will be modulated with the values of their gradient modulus to produce an image in which edges are emphasized and other features are semi-transparent. The degree of contrast can be adjusted with the Contrast slider, as shown below.
|
| Fill** |
|
If selected, the voxels that correspond to the inside or outside of the clipped region will be filled with a solid color. To select a fill color, click the color swatch and then choose a color in the Color dialog.
|
|
Lookup Table* and Absolute Lookup Table* |
|
If selected, a lookup table function (LUT) or an absolute LUT will be applied to selected image data that corresponds to the inside or outside of the clipped region. LUTs determine how regions within specific arrays of intensity are highlighted and how color is applied (see Using the LUT Editor). Look-up tables can be selected in the drop-down menu, as shown below.
NOTE If you choose an absolute LUT, color mapping will be applied independently of window leveling. This means that the colors mapped to specific values will be retained whenever leveling values are changed. For regular LUT functions, colors will be remapped to the range of values defined by the window width. |
|
Window Leveling* |
|
If selected, independent window level values can be applied to the data of selected visual(s) that corresponds to the inside or outside of the Clip box. The width of the window, as well as its center value, can be selected with the Width and Center sliders, as shown below.
|


* Applicable to selected image data and image data corresponding to selected regions of interest and multi-ROIs.
** For image data, all voxels within the bounding box will be considered. For regions of interest and multi-ROIs, only labeled voxels will be considered. For meshes, only voxels that correspond to the surface of the mesh will be considered.
In some cases, you may find it advantageous to apply multiple effects to a visual or visuals. For example, edge contrast and a look-up table.
Multiple effects — edge contrast and LUT — applied

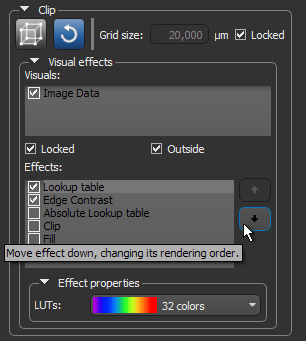
You should note that when rendering a visual, Dragonfly will apply the selected effects in the order in which they appear in the Effects panel. Reordering effects will have an impact on the final look of the visual by either subtly or dramatically changing its appearance. If required, you can reorder selected effects with the Up and Down buttons on the right side of the panel, as shown below.
Reordering effects
You may need to adjust an effect property after reordering.
A number of configured actions and keyboard shortcuts are available for using the Clip tool. The default settings for these actions are listed in the following table.
|
Action |
State |
Key |
Mouse |
|---|---|---|---|
|
Lock/Unlock the Clip box |
|
Left Ctrl + B |
|
|
Show the Clip box |
|
B |
|
|
Manipulate the Clip box |
OrsStateClipBoxManipulate |
|
Left mouse |
|
Reset the Clip box |
|
V |
|
See Configurable Actions for information about mapping shortcuts and mouse actions to the Clip tool.